Getting Started
Getting and Installing CMake on Your Computer
Before using CMake, you will need to install or build the CMake binaries on your system. On many systems, you may find that CMake is already installed or is available for installation with the standard package manager tool for the system. Cygwin, Debian, FreeBSD, OS X MacPorts, Mac OS X Fink, and many others all have CMake distributions.
If your system does not have a CMake package, you can find CMake precompiled for many common architectures on the CMake Download page. Select the desired release and follow the download instructions. CMake may be installed to any directory, so root privileges are not required for installation.
If you do not find precompiled binaries for your system, then you can build
CMake from source. To build CMake, you will need a modern C++ compiler and the
source distribution from the
CMake Download page or
Kitware’s GitLab instance. To build
CMake, follow the instructions in README.rst at the top of the source tree.
Directory Structure
There are two main directories CMake uses when building a project: the source directory and the binary directory. The source directory is where the source code for the project is located. This is also where the CMakeLists files will be found. The binary directory is sometimes referred to as the build directory and is where CMake will put the resulting object files, libraries, and executables. CMake will not write any files to the source directory, only to the binary directory.
Out-of-source builds, where the source and binary directories are different, are strongly encouraged. In-source builds where the source and binary directories are the same are supported but should be avoided if possible. Out-of-source builds make it very easy to maintain a clean source tree and allow quick removal of all of the files generated by a build. Having the build tree differ from the source tree also makes it easy to support having multiple builds of a single source tree. This is useful when you want to have multiple builds with different options but just one copy of the source code.
Basic CMake Usage
CMake takes one or more CMakeLists files as input and produces project files or Makefiles for use with a wide variety of native development tools.
The typical CMake process is as follows:
The project is defined in one or more CMakeLists files
CMake configures and generates the project
Users build project with their favorite native development tool
Each step of the process is described in detail in the following sections.
CMakeLists Files
The CMakeLists files (actually CMakeLists.txt but it is common to leave
off the extension) are plain text files that contain the project description
in CMake’s Language. The cmake-language is
expressed as a series of comments, commands and variables. You might wonder
why CMake decided to have its own language instead of using an existing one
such as Python, Java, or Tcl. The main reason is that CMake developers did
not want to make CMake require an additional tool to run. By requiring one of
these other languages, all users of CMake would be required to have that
language installed, and potentially a specific version of that language. This
is on top of the language extensions that would be required to do some of the
CMake work, for both performance and capability reasons.
Hello World for CMake
To begin, let us consider the simplest possible CMakeLists file. To compile an executable from one source file, the CMakeLists file would contain three lines:
cmake_minimum_required(VERSION 3.20)
project(Hello)
add_executable(Hello Hello.c)
The first line of the top level CMakeLists file should always be
cmake_minimum_required. This allows projects to require a given
version of CMake and, in addition, allows CMake to be backwards compatible.
The next line of any top level CMakeLists file should be the project
command. This command sets the name of the project and may specify other
options such as language or version.
For each directory in a project where the CMakeLists.txt file invokes
the project command, CMake generates a top-level Makefile or IDE
project file. The project will contain all targets that are in the
CMakeLists.txt file and any subdirectories, as specified by the
add_subdirectory command. If the EXCLUDE_FROM_ALL option
is used in the add_subdirectory command, the generated project will
not appear in the top-level Makefile or IDE project file; this is
useful for generating sub-projects that do not make sense as part of
the main build process. Consider that a project with a number of
examples could use this feature to generate the build files for each
example with one run of CMake, but not have the examples built as part
of the normal build process.
Finally, use the add_executable command to add an executable to the
project using the given source file.
In this example, there are two files in the source directory:
CMakeLists.txt and Hello.c.
The next sections will describe how to configure and build the project using the CMake GUI and command line interfaces.
Configure and Generate
After a CMakeLists file has been created, CMake processes the text file and creates entries in a cache file. Users may edit the CMakeLists file or specify cache values with the CMake gui or ccmake and re-configure. Next, CMake uses the cache entries to generate a project in the user’s desired build system (e.g. Makefile or Visual Studio solution).
Running the CMake GUI
CMake includes a Qt-based user interface that can be used on most
platforms, including UNIX, Mac OS X, and Windows. The
cmake-gui is included in the CMake source code, but
you will need an installation of Qt on your system in order to build it.
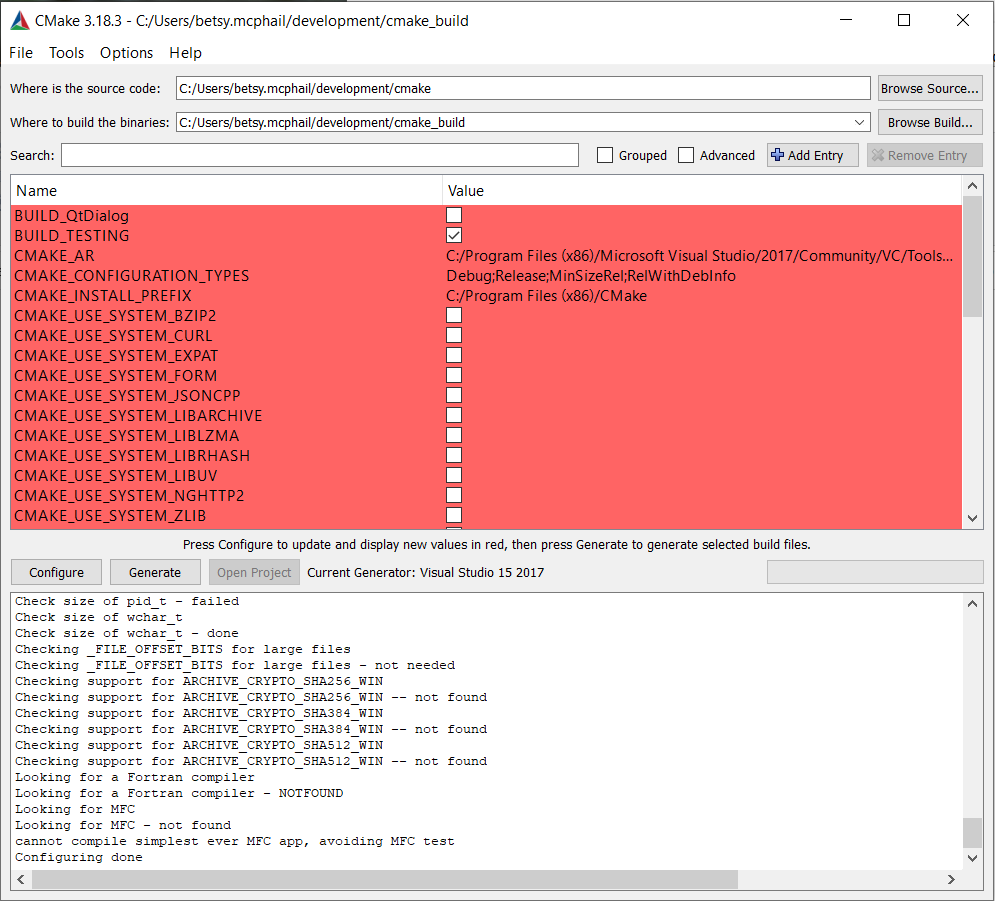
Figure 1: Qt based CMake GUI
On Windows, the executable is named cmake-gui.exe and it should be
in your Start menu under Program Files. There may also be a shortcut
on your desktop, or if you built CMake from the source, it will be in
the build directory. For UNIX and Mac users, the executable is named
cmake-gui and it can be found where you installed the CMake
executables. A GUI will appear similar to what is shown in Figure
1. The top two fields are the source code
and binary directories. They allow you to specify where the source
code is located for what you want to compile, and where the resulting
binaries should be placed. You should set these two values first. If
the binary directory you specify does not exist, it will be created
for you. If the binary directory has been configured by CMake before,
it will then automatically set the source tree.
Running the ccmake Curses Interface
On most UNIX platforms, if the curses library is supported, CMake
provides an executable called ccmake. This interface is a
terminal-based text application that is very similar to the
cmake-gui. To run ccmake, change
directories into the directory where you want the binaries to be placed. Then
run ccmake with the path to the source directory on the
command line. This will start the text interface as shown in Figure
2.
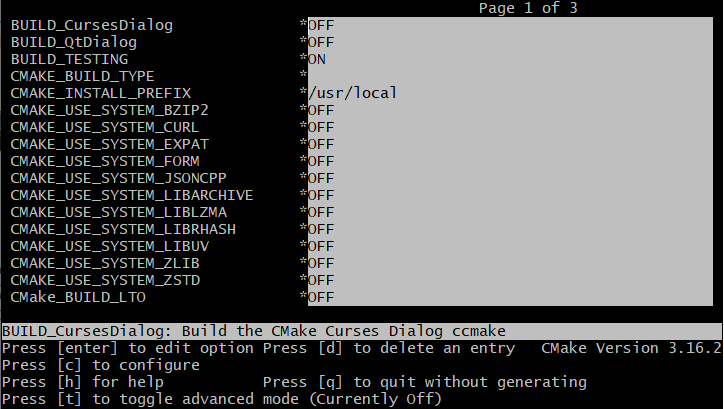
Figure 2: ccmake running on UNIX
Brief instructions are displayed in the bottom of the window. If you hit the “c” key, it will configure the project. You should always configure after changing values in the cache. To change values, use the arrow keys to select cache entries, and hit the enter key to edit them. Boolean values will toggle with the enter key. Once you have set all the values as you like, you can hit the “g” key to generate the Makefiles and exit. You can also hit “h” for help, “q” to quit, and “t” to toggle the viewing of advanced cache entries.
Running CMake from the Command Line
From the command line, the cmake executable can be used
to generate a project buildsystem. This is best suited for projects with few
or no options. For larger projects like VTK, using ccmake, or the cmake-gui is recommended. To
build a project with cmake, first create and change
directory to where you want the binaries to be placed. Run
cmake specifying the path to the source tree and pass in
any options using the -D flag. Unlike ccmake, or the
cmake-gui, the configure and generate steps are
combined into one when using the cmake executable.
Specifying the Compiler to CMake
On some systems, you may have more than one compiler to choose from or your compiler may be in a non-standard place. In these cases, you will need to specify to CMake where your desired compiler is located. There are three ways to specify this: the generator can specify the compiler; an environment variable can be set; or a cache entry can be set. Some generators are tied to a specific compiler; for example, the Visual Studio 19 generator always uses the Microsoft Visual Studio 19 compiler. For Makefile-based generators, CMake will try a list of usual compilers until it finds a working one.
The lists can be preempted with environment variables that can be set
before CMake is run. The CC environment variable specifies the C
compiler, while CXX specifies the C++ compiler. You can specify
the compilers directly on the command line by using
-DCMAKE_CXX_COMPILER=cl for example. Once cmake has
been run and picked a compiler, if you wish to change the compiler, start
over with an empty binary directory.
The flags for the compiler and the linker can also be changed by setting
environment variables. Setting LDFLAGS will initialize the cache values for
link flags, while CXXFLAGS and CFLAGS will initialize
CMAKE_CXX_FLAGS and CMAKE_C_FLAGS respectively.
Build Configurations
Build configurations allow a project to be built in different ways for debug, optimized, or any other special set of flags. CMake supports, by default, Debug, Release, MinSizeRel, and RelWithDebInfo configurations. Debug has the basic debug flags turned on. Release has the basic optimizations turned on. MinSizeRel has flags that produce the smallest object code, but not necessarily the fastest code. RelWithDebInfo builds an optimized build with debug information as well.
CMake handles the configurations in slightly different ways depending on the generator being used. The conventions of the native build system are followed when possible. This means that configurations impact the build in different ways when using Makefiles versus using Visual Studio project files.
The Visual Studio IDE supports the notion of Build Configurations. A
default project in Visual Studio usually has Debug and Release
configurations. From the IDE you can select build Debug, and the files
will be built with Debug flags. The IDE puts all of the binary files
into directories with the name of the active configuration. This
brings about an extra complexity for projects that build programs that
need to be run as part of the build process from custom commands. See
the CMAKE_CFG_INTDIR variable and the custom commands section for
more information about how to handle this issue. The variable
CMAKE_CONFIGURATION_TYPES is used to tell CMake which
configurations to put in the workspace.
With Makefile-based generators, only one configuration can be active
at the time CMake is run, and it is specified with the
CMAKE_BUILD_TYPE variable. If the variable is empty then no flags
are added to the build. If the variable is set to the name of a
configuration, then the appropriate variables and rules (such as
CMAKE_CXX_FLAGS_<ConfigName>) are added to the compile
lines. Makefiles do not use special configuration subdirectories for
object files. To build both debug and release trees, the user is
expected to create multiple build directories using the out-of-source
build feature of CMake, and set the CMAKE_BUILD_TYPE to the
desired selection for each build. For example:
# With source code in the directory MyProject
# to build MyProject-debug create that directory, cd into it and
ccmake ../MyProject -DCMAKE_BUILD_TYPE=Debug
# the same idea is used for the release tree MyProject-release
ccmake ../MyProject -DCMAKE_BUILD_TYPE=Release
Building Your Project
After you have run CMake, your project will be ready to be built. If your target generator is based on Makefiles then you can build your project by changing the directory to your binary tree and typing make (or gmake or nmake as appropriate). If you generated files for an IDE such as Visual Studio, you can start your IDE, load the project files into it, and build as you normally would.
Another option is to use cmake’s --build option from
the command line. This option is simply a convenience that allows you to build
your project from the command line, even if that requires launching an
IDE.
That is all there is to installing and running CMake for simple projects. In the following chapters, we will consider CMake in more detail and explain how to use it on more complex software projects.